
HYCOM dataset usage
HYCOM Datasets
In HYCOM Data Server, the results of HYCOM's global ocean flow field reproduction prediction results are available as a dataset. The two main ones are: They are Analysis and Reanalysis. The difference in contents is written in here.
The items are the same for both, SSH (sea surface height), zonal velocity (east-west velocity), meridional velocity (north-north velocity), temperature (in-situ water temperature), and salinity.
GOFS 3.1: 41-layer HYCOM + NCODA Global 1/12 ° Analysis
Archive from July 2014 to the present. Details are here. Be careful that there are Missing days.
GOFS 3.1: 41-layer HYCOM + NCODA Global 1/12 ° Reanalysis
This is an archive every 3 hours from January 1, 1994 to December 31, 2015. Details are here. Be careful that there are also Missing days.
How to download data
Reanalysis data is adopted as an example. The data set is archived in here, and select a year (2015 here) and click on Download site.
If you click NetcdfSubset:, you can download by entering the area and period, but if you do not narrow down considerably, you will get 500 Internal error; you can not download.
By contrast, when you click FTP, you can download by entering anonymous to the user account, but you would get an error every time. Actually, this FTP site has NetCDF archive, and it seems that you can download one file at a time, but there is about 1GB per file, which is not feasible.
Click on OPeNDAP to display the OPeNDAP Dataset Access Form as shown below. The following describes how to download with OPeNDAP.
NCL preparation
A method using NCL is introduced. It seems that Windows native version is not prepared; it is assumed that Miniconda is installed on Ubuntu 18.04LTS on WSL on Windows 10 Pro.
ncl installation
As given here, ncl can be installed with conda. For safety, install it in a virtual environment ncl.
$ conda create -n ncl
$ conda activate ncl
$ conda install -c conda-forge ncl
Let's check it.
$ ncl -V
6.6.2
The following tests require X11 Window. The standard terminal of WSL Ubuntu 18.04 does not support X11 Window. Therefore, prepare MobaXterm and open WSL-Ubuntu session. The first one shows a figure in the X11 Window; the figure changes each time the figure panel is clicked on with the mouse. In the second one, NUG_multi_timeseries.png file is to be created.
$ ncl $NCARG_ROOT/lib/ncarg/nclex/gsun/gsun02n.ncl
$ ncl $NCARG_ROOT/lib/ncarg/nclex/nug/NUG_multi_timeseries.ncl
For NCL, prepare an ncl script and execute it with the ncl command.
$ ncl sample.nclOPeNDAP testing
Prepare ncl script test_opendap.ncl with the following contents.
; --- Path to file served by OPeNDAP server at NOAA
  url = "http://www.esrl.noaa.gov/psd/thredds/dodsC/Datasets/ncep.reanalysis.dailyavgs/pressure/"
  filename = "air.1948.nc"

  exists = isfilepresent (url + filename)
  if (.not.exists) then
    print ("OPeNDAP test unsuccessful.")
    print ("Either the file doesn't exist, or NCL does")
    print ("not have OPeNDAP cabilities on this system.")
  else
    f = addfile (url + filename, "r")
    vnames = getfilevarnames (f)
    print (vnames)
  end if
Executing the script will yield the following result, which is successful.
$ ncl test_opendap.ncl
 Copyright (C) 1995-2019-All Rights Reserved
 University Corporation for Atmospheric Research
 NCAR Command Language Version 6.6.2
 The use of this software is governed by a License Agreement.
 See http://www.ncl.ucar.edu/ for more details.

Variable: vnames
Type: string
Total Size: 40 bytes
            5 values
Number of Dimensions: 1
Dimensions and sizes: [5]
Coordinates:
(0) level
(1) lon
(2) lat
(3) time
(4) air
Specify the download target
GOFS 3.1: 41-layer HYCOM + NCODA Global 1/12 ° Reanalysis is taken as an example. Click on the ACCESS DATA HERE icon on this page.
Click the download target. For example, select here.
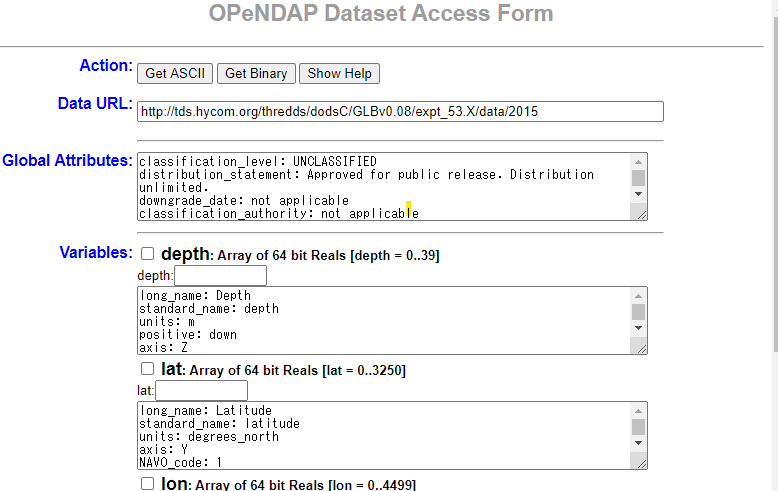
Click on the URL of OPENDAP of Access and move on to this form (see above figure).
Check the variable you want to download in Variables of this form and edit the range etc. Every time you edit the form, the Data URL in the second line changes. After completing these tasks, click the Get ASCII button at the top to save the contents.
Download dataset using NCL
Create an ncl script for download. The Data URL of the form is the download target, and copy this URL to the following script (enclose it by " " like "URL").
; --- Path to file served by OPeNDAP server at NOAA
  url = "URL"

  exists = isfilepresent (url)
  if (.not.exists) then
    print ("OPeNDAP test unsuccessful.")
    print ("Either the file doesn't exist, or NCL does")
    print ("not have OPeNDAP cabilities on this system.")
  else
    f = addfile (url, "r")
    vnames = getfilevarnames (f)
    print (vnames)
  end if
url can also be given as a command line argument as follows. Make the index consistent across all variables. For example, the index notation of time should be the same for all variables.
$ ncl 'url = "http://tds.hycom.org/thredds/dodsC/GLBv0.08/expt_53.X/data/2015?depth[0:1:39],lat[1935:1:1940], lon [3993: 1: 4000], time [0: 1: 3], salinity [0: 1: 3] [0: 1: 39] [1935: 1: 1940] [3993: 1: 4000] "'hycom_gofs31 .nclIt is necessary to export as a new NetCDF, which will be summarized later.
Invoke NCL script from Python
Consider to invoke NCL script from Python (Jupyter Notebook). Suppose the virtual environment ncl has been activated. Install some packages.
$ conda install jupyterlab matplotlib netCDF4 pandas xarrayMove to the directory where an NCL script exists and start Jupyter Lab.
$ jupyter labWhen the WSL Ubuntu 18.04LTS terminal is launched with MobaXterm, a url like below appears in the terminal. Select the url with mouse; paste it in the Windows Chrome browser; then press Enter. Jupyter Lab will stand up.
http://localhost:8888/?token=0c9c7ca0a56a838fd0f980a3c5a0748b4a42166fdba5eba9To invoke NCL script in Jupyter Notebook, define a list consisting of command ncl and its script as elements.
import subprocess
cmd = ["ncl", "test_opendap.ncl"]
subprocess.run(cmd)
To display the output in the shell.
res = subprocess(cmd)
res.decode("utf-8")
You may also execute shell commands by adding the ! mark at the beginning.
!ls